
If you’re like most people, you probably don’t give much thought to your home’s exhaust fans. Behind the scenes, they do important work for you, both in the bathroom and the kitchen and shouldn’t be ignored. Both types of exhaust fans should be designed to move air out of your home and vent it to the outside and each type has its own specific purposes.
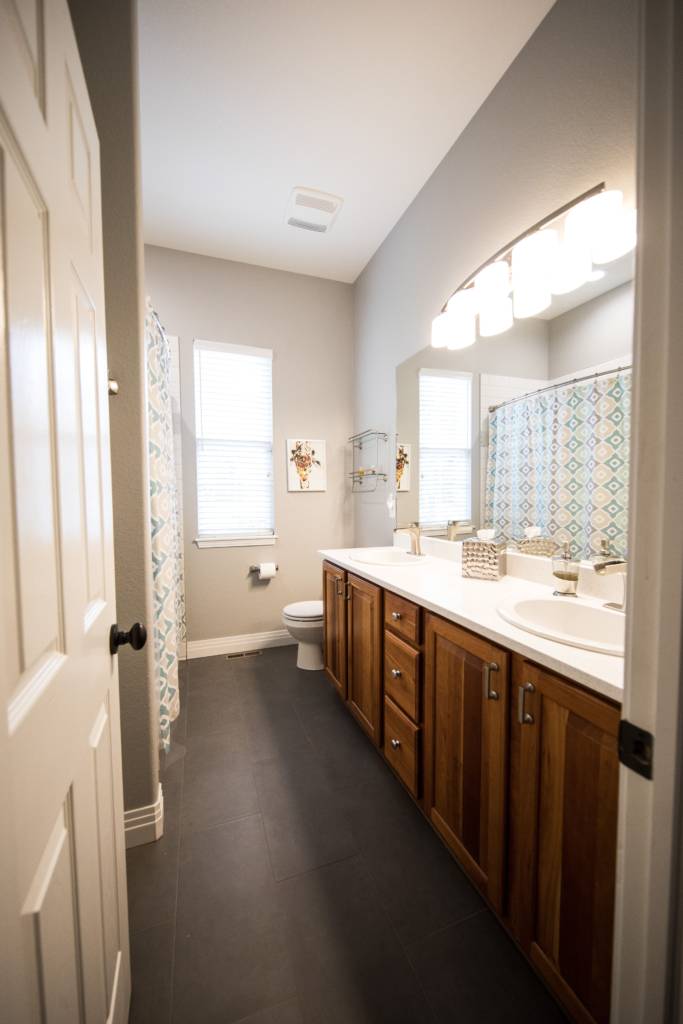
Bathroom exhaust fans remove both moisture and odors from the room. The more important of these two functions is the removal of moisture because too much can lead to the development of mold and mildew. Excessive moisture in the bathroom can even cause paint or wallpaper to peel, among other things. You should run your bathroom exhaust fan when you take a shower and for approximately twenty minutes afterward to dispel the moisture build up. If you take especially hot showers, run the fan for 25-30 minutes.
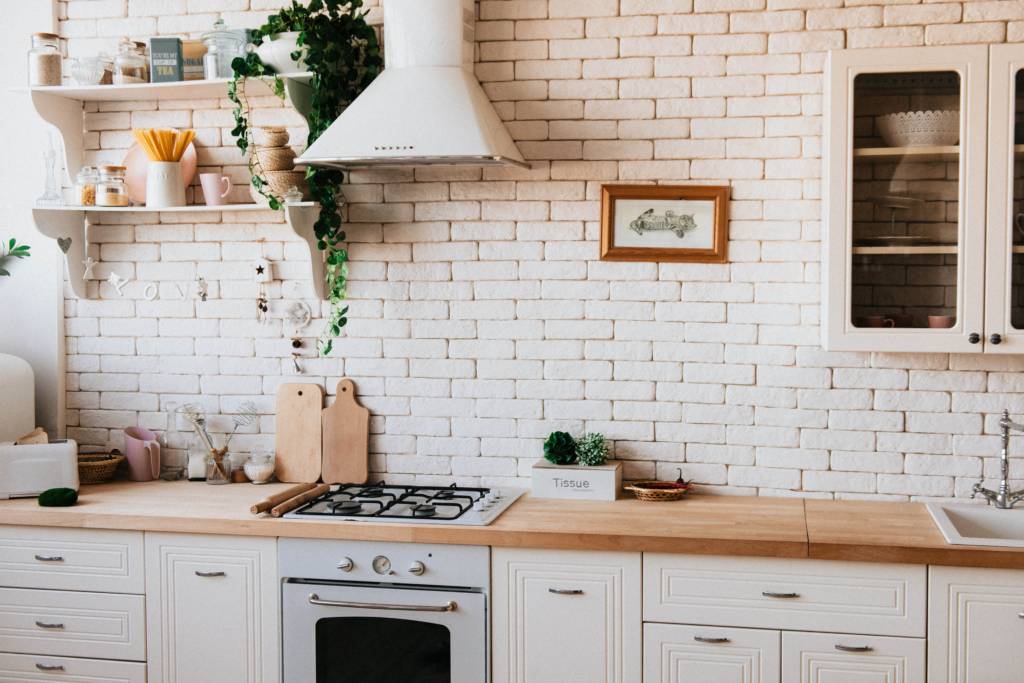
In the kitchen, not only does the exhaust fan pull away steam from cooking, but also smoke, odors, heat and even grease. You should use your kitchen exhaust fan every time you cook. Even so, grease will build up on the exhaust fan filters and eventually make it to the fan itself. However, if grease is allowed to build up on these fans, it will eventually affect the fans’ performance and could cause them to fail. In more dangerous situations, a grease fire could be the result. For these reasons, your kitchen exhaust fan should be cleaned at least once per year.
The kitchen exhaust fan filters also pose a fire hazard when allowed to build up with too much grease. These should be cleaned much more often. Not only can the built-up grease in the filters ignite, but also grease can drip down onto an ignition source, like hot pans or heating elements, and cause a grease fire. Keeping these filters clean is a relatively easy task but a very important one for the safety of those in your home.
It may come as a surprise, but bathroom exhaust fans can also become a fire hazard. The buildup of lint and dust can ignite if the fan gets too hot, causing the surrounding materials to catch fire as well. So, while you should run your bathroom exhaust fan long enough to rid your bathroom of excess moisture, you should not run it any longer than necessary or leave it running when you are not at home.
Since sometime in the 1990’s, homes have been equipped with thermally protected bathroom exhaust fans to help combat this problem. You should replace your bathroom fan with a thermally protected unit if your bathroom exhaust fan suffers from any of the following problems:
- It is not easily accessed for routine cleaning
- It looks like it’s had heat damage
- It does not turn effortlessly
Bathroom exhaust fans should be cleaned at least once per year, but twice is better. This will not only help prevent fires and the growth of mold or mildew but will also make them run more efficiently.
Another thing you might want to consider is to either replace your existing bathroom exhaust fan with a new one that has a timer, or to install a timer on your current fan. That way, your bathroom exhaust fan will go off automatically, keeping it from running for too long and becoming a fire hazard.
At some point, it may become advisable to replace your bathroom or kitchen exhaust fans for other reasons. The average lifespan of a bathroom exhaust fan is about 10 years; but, if it’s making noises or smelling strange, the time has come to replace it. Kitchen exhaust fans have a somewhat longer lifespan of about 15 years. In the meantime, you’ll want to know how to clean these exhaust fans and make cleaning them a regular part of your home maintenance routine.
How to Clean Your Bathroom Exhaust Fan
While cleaning your bathroom exhaust fan once a year is a good rule of thumb. However, if you notice a lot of dust on the cover or your bathroom is getting very steamy while you’re running your fan, it’s time to clean it.
- The first thing you should always do when undertaking such a project is to turn the power off at the source – the breaker box. Next, make sure you have something sturdy and stable to stand on to reach the exhaust fan cover.
- Remove any screws holding the cover in place or pull the cover down gently and squeeze the metal pins together to release it.
- Wash the cover in warm water with dish soap, and a soft scrub brush if necessary, to get all the dirt and grime off.
- Now, depending on your comfort level, you can choose one of two ways to clean your bathroom exhaust fan:
- Method one
- Vacuum the fan and motor assembly with the dusting attachment of your vacuum cleaner to get as much dust and lint as you can from these surfaces.
- Vacuum the housing around the fan with the dusting attachment or use the crevice tool for tighter spots
- Replace the cover you have just cleaned, once it’s good and dry.
- Method two
- First make sure the power is off at the breaker box.
- Next, unplug the fan.
- Remove any other screws anchoring the unit.
- Remove the fan and motor assembly to be cleaned.
- Clean the fan blades and other parts of the motor with a damp microfiber cloth. (Make sure everything is dry before you start to put it back together.)
- Vacuum out the housing with your vacuum attachment. Don’t get too aggressive as you might damage your exhaust vent or housing.
- Put the fan and motor assembly back in the same way you took it out.
- Plug it back in.
- Replace the cover.
- Method one
- Turn your circuit breaker back on.
- Test your bathroom exhaust fan by letting it suck up and hold a piece of tissue to the cover. It should if it’s working properly.
- Finally, check that your bathroom exhaust fan is actually venting to the outside. You should have a flap over your outside vent. It should be clean and unobstructed. If something is causing it to stay open, even partially, you are losing air conditioning and heat, not to mention that unwanted pests can enter your home this way.
How to Clean Kitchen Exhaust Fan Grease
As mentioned earlier, this is a very important chore. It consists of two parts: cleaning the exhaust fan filters and cleaning the exhaust fan blades and housing. While the kitchen exhaust fan should be cleaned at least every year, the exhaust fan filters should be cleaned much more frequently, as they are doing most of the greasy work. Before embarking on this project, however, you may want to check your manual to see what cleaners are approved for your unit, and to see if your filters are the reusable kind or the kind you just throw away and replace.
To Clean Kitchen Exhaust Fan Filters:
- For a reusable mesh filter, after removing the filter from its slot, soak it in boiling water, a good grease-cutting dish soap and one-quarter cup of baking soda.
- Then scrub with a brush that won’t harm the mesh and some more soap.
- Rinse the filter well; and, let it dry.
Something else you can try is to obtain a water-based degreaser from your local auto parts store and soak your filter in it for a little while. Then rinse it well and let it dry before replacing it.
To Clean Kitchen Exhaust Fan Blades:
- Turn off the power at the breaker box.
- Unplug the fan.
- The next steps are where referring to your manual comes in handy. You’ll want to know what cleaning products you can use on your specific model. Here are two methods you might use:
- Method one
- Use trisodium phosphate cleaner, or a solution made of a quart of warm water, one-quarter cup of ammonia and two tablespoons of baking soda.
- Wear a mask for this.
- Begin scrubbing at the back of the fan housing, then scrub the blades.
- Dry with paper towels as you go along.
- Repeat as many times as necessary to remove all the grease.
- Allow to dry.
- Method two
- Remove any screws holding the fan assembly.
- Clean the cover and blades with mild soap and a damp cloth.
- If needed, use an unsharpened knife to scrape off any remaining grease.
- Rinse well and dry with paper towels
- Put the fan back together.
- Method one
Don’t Forget Kitchen Range Hoods
Grease collects under the range hood as well as in the filter and on the fan blades. Make sure you clean this area out on a periodic basis as well to keep grease from collecting and dripping onto your stove. Just as with the exhaust fan filters, grease dripping from the range hood can be a fire hazard.
- Turn off the power at the breaker box before beginning to clean under the hood.
- Use a cloth or sponge with a degreaser as approved by your manual to clean these areas, especially where grease collects in the corners or grooves.
- Your range hood should be cleaned on a regular basis, both inside and out, with a degreaser; or, you can dip a cloth in denatured alcohol to get the job done.
As with your bathroom exhaust fan, you’ll want to know where your kitchen exhaust fan is venting. It should be venting to the outside of your home. However, it is common for indoor range hoods to blow the filtered smoke back out into your home. This is where keeping a clean filter is paramount. This helps not only with keeping the grease out of your exhaust fan, but also from other surfaces in your home as well.
If you are installing a new kitchen exhaust fan, or having your home built, you’ll want to pay close attention to these important construction details. Not only should your kitchen exhaust fan vent to the outside of your home, but it should also be designed to handle the size of your kitchen. Furthermore, all the seams in the venting to the outside should be sealed with metal (aluminum) tape to keep grease out of concealed spaces in your home. As you can imagine, any deposits of grease in these areas could pose a serious fire hazard.
How to Put Out a Grease Fire in the Kitchen
You now know that cleaning your kitchen exhaust fan filters, blades, housing and range hood are all important to prevent grease fires. But, what should you do if a grease fire does occur in your kitchen?
*NEVER throw water on a grease fire; it will only cause it to spread further.
Here are the things you CAN do to douse a grease fire. The idea is to take away its oxygen so it can no longer burn.
- Turn the burner off.
- If safe to do so, cover the flames with the pan’s metal lid, another pot or a cookie sheet by sliding it over the pan. Never try to move the pan.
- Cover the flames with a large amount of baking soda, not flour. Salt will also smother the flames. (Don’t use any other baking powders; they will make it worse.) You can then cover the pan also.
- Use a Class B Dry Chemical fire extinguisher. CAVEAT: you can cause the fire to spread if you spray the extinguisher directly at the flames. You have to stand back and spray, which takes longer. This should be your last resort.
The most important thing you can do in the event of a grease fire is protect your own safety and that of others in the home. If you are unable to contain the fire, get to safety; and, call 911. Close the door on your way out to keep the fire contained.
So, now you know how important it is to keep your home’s exhaust fans clean and running smoothly, both in the bathroom and the kitchen. If you keep up a regular cleaning regimen, your home will stay a lot cleaner, fresher, and safer for you and your family.