
If you own a home, chances are you’ve come across an issue or two involving electrical maintenance, either in built-in wiring or appliance issues. From changing a light bulb to dealing with tripped circuit breakers, there are many things that may need attention in your home at some point. First and foremost, safety should be your key concern. Here are a few things you can do to inspect your home for safety issues on a regular basis.
- Be diligent in checking all power cords regularly. If any are damaged, cracked, or have brittle insulation, they should be discarded and replaced. The same is true if any cord or wire is frayed, as they can cause shocks or fires.
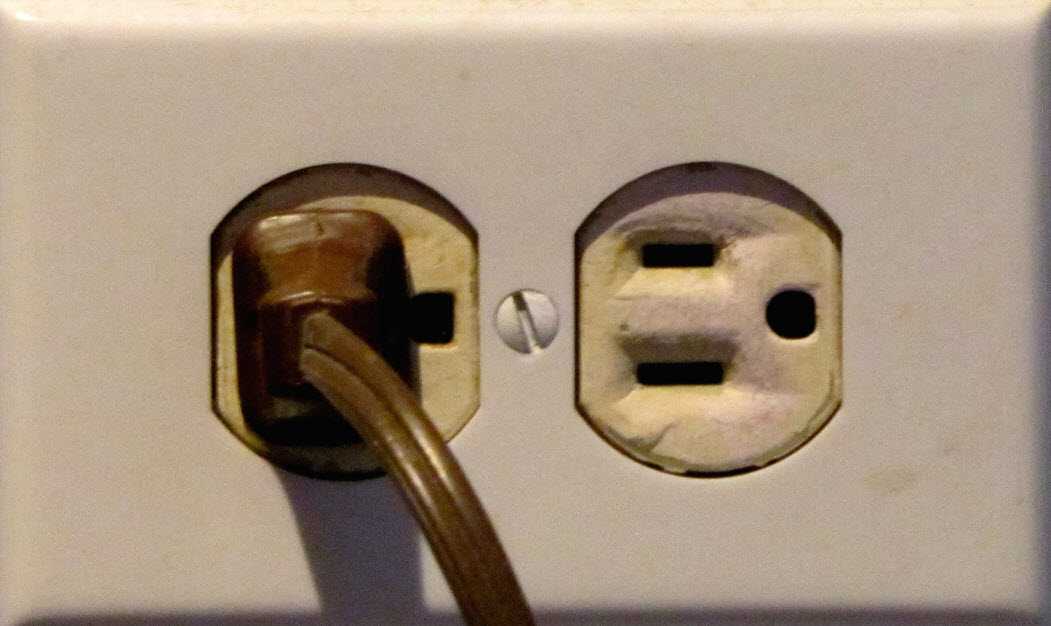
- Replace plugs that wobble or fit loosely in the outlet, assuming the problem is not with the outlet receptacle (see below).
- Maintain safe distance between heat sources (space heaters, radiators…etc.) and cords and plugs.
- Test your outlets either by using a receptacle tester or by plugging in something simple, like a radio or lamp. If an outlet isn’t working, it may need to be replaced. All outlets installed near wet places, such as kitchens, laundry rooms, or bathrooms should be ground-fault circuit interrupters, or GFCIs. You test these in the same manner, except if the GFCI is functioning as it should, a lamp should go off when you push the “test” button and back on again when you hit “reset.”
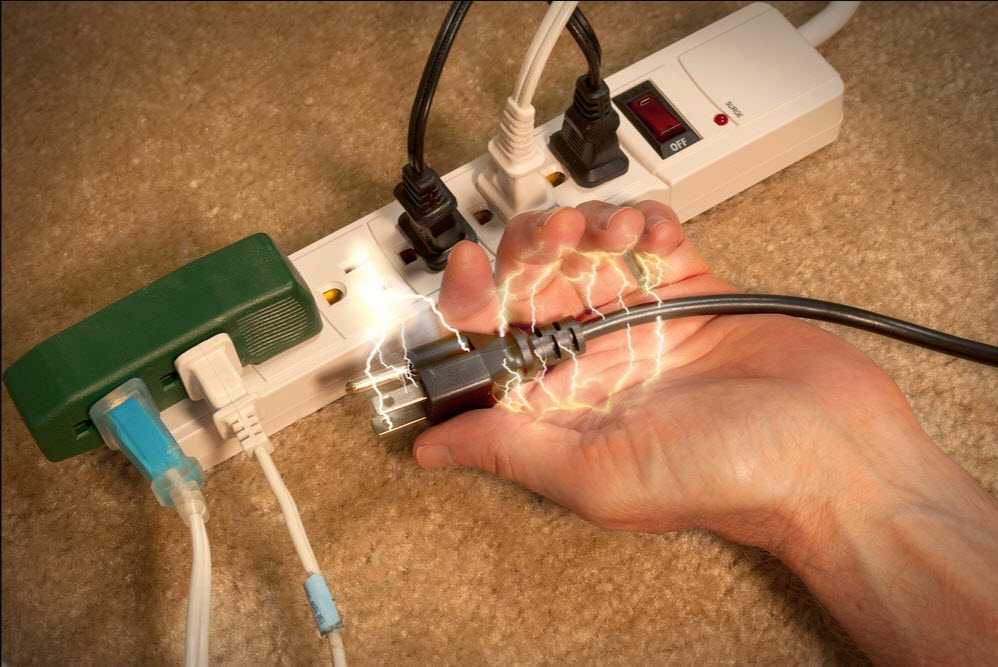
- Ensure proper outlet load. Only one heat-producing appliance, such as a toaster, coffee machine, or space heater should be plugged into an outlet at any time. Major appliances such as refrigerators, dryers and stoves should all be plugged into the wall without the use of an extension cord.
- Inspect breaker box panels for burnt or scorched places or loose wiring. If you find anything, don’t attempt to touch it, call a professional electrician.
- Equip light bulbs with covers/shades because exposed lightbulbs can cause fires.
Note, according to a report posted in March of 2019 by the National Fire Protection Association, the second leading cause of home fires in the U.S. between 2012 and 2016 was electrical failure or malfunctions. These accounted for 13 percent of all residential fires. Most occurred as a result of electrical distribution and lighting equipment (10 percent), making those the third leading cause of home fires. Finally, while approximately 24 percent of electrical fires happen between midnight and 8 A.M., they account for 60 percent of fatalities.
Signs You may have an Electrical Problem
- Frequent problems with circuit breakers overloading, with fuses blowing regularly.
- Lights flicker or dim, with periodic power outages.
- Excessive heat emitted from electrical devices and appliances or causing a tingling feeling when touched.
- Receiving a shock or seeing sparks from any appliance or electrical outlet.
- Burning rubbery smells from your appliance(s).
- Discolored wall outlets or warm to the touch.
5 Primary Causes of Home Electrical Fires
- Faulty outlets and appliances
- Most electrical fires are caused by faulty outlets or old appliances. One reason is that old appliances pull a lot of power. Also, there could be problems with the cord, or even the inside of the appliance. Never use an appliance with a worn, damaged or frayed cord because it can apply heat to flammable surfaces. Don’t use it if the receptacle is loose. Never run cords under rugs. Never remove the grounding plug from a cord, modify a three prong plug or force a three-prong plug into a two-prong outlet.
- Light fixtures
- Always use light bulbs within the maximum wattage called for by the light fixture. One of the number one causes of electrical fires is using a bulb of too high a wattage. Faulty light fixtures and lamps often cause fires as well. Never put anything flammable, like paper or fabric, over a lampshade for decoration or effect. If a lamp or light fixture seems overly hot when on, decrease the wattage of the bulb.
- Extension cords
- These are meant to be used temporarily only, not as a permanent fix. Have an electrician install electrical outlets where you need them, instead of relying on extension cords. Never run cords under rugs and don’t overload the extension cord with a lot of devices.
- Space heaters
- These can be quite dangerous, especially the coil-type because the coils get very hot. A safer alternative is the radiator-type. Still, keep them away from anything flammable like bedding or curtains. Make sure you use only the most current model with modern safety features and that it is the right size for the space you are heating. Never leave them unattended. You can easily have a dedicated electrical circuit put in for your space heaters to plug into, but in any case; they should go directly into the wall, not an extension cord.
- Wiring
- Older wiring, such as that over 20 years old, is unable to cope with the new appliances of the times, such as video game systems, air conditioners, and wide screen TVs. The same is true of old breaker boxes, which can develop worn connectors that won’t trip the breakers, thus overloading the system and resulting in electrical fires. Since adding all these new devices causes an increase in the total power required and can therefore exceed the original capacity of your home’s wiring, replacing the service panel with a new one having a higher amp rating will allow for the added load caused by the new devices.
If you notice any of these signs, it may be time to call in professional help. Puzzling electrical issues often require proper expertise. However, there are some things you may be able to do yourself, like replacing malfunctioning appliances and even replacing an electrical outlet, also called a receptacle.
Three Types of Terminals
There are (3) types of terminals found on the back of the receptacles (electrical outlets) that will determine how you will connect the wires.
- Screw type terminals, in which the wires that connect them have been stripped, shaped into a “C,” attached under a terminal screw clockwise, then tightened. These can be difficult to remove if wrapped all the way around the terminals. You may have to strip approximately three fourths of an inch of insulation from the wires first, make a “C” shape, attach to the new terminal and then tighten.
- Slide in terminals, which are the common kind of receptacles you find in kitchens and bathrooms (GFCIs). With these, you loosen the terminal screw, insert a stripped wire into the slot, and tighten.
- Push-in terminals, wherein you insert a stripped wire into the terminal hole and the wire is held there by tension inside the hole. You can remove these wires by inserting a 3/32-inch screwdriver into the slot next to the terminal, or by taking hold of the wire and pulling and twisting all at once. These wires can also be cut in close to the terminal.
How to Replace an Electrical Receptacle
How do you know when it’s time to replace an electrical receptacle, also known as an “outlet”? If it’s cracked, plugs fit loosely in it, or it simply isn’t working, it’s probably time. But, before you decide to do any electrical work in your home, you need to determine whether a permit is required in your state, whether you may obtain it yourself, and whether you, the homeowner, are even allowed to do the electrical work yourself. Also, there may be ordinances, rules, or building codes that require you to follow specific procedures when replacing such electrical devices. There may be hefty fines or other repercussions for failing to obtain the proper permits.
It is critical that you replace a receptacle (outlet) with one that is exactly like the old one and has the same amperage rating. The typical 120-volt receptacle will have one of two amperage ratings, either 15-amp or 20-amp. Never replace a receptacle on a 15-amp circuit with a 20-amp receptacle!
There are a couple of ways you can determine the amperage rating for your receptacle. The wiring leading to the 20-amp receptacle, the circuit wires, will be 12 gauge and usually have a yellow sheath. On the other hand, the wires leading to the 15-amp receptacle will be 14 gauge and generally have a white sheath. In addition, the circuit breaker on a 20-amp circuit must be marked with a “20,” and the 15-amp circuit breaker must be marked with a “15.”
Tools and Supplies Needed
- Receptacle tester
- Replacement receptacle
- Screwdriver(s)
- Single edge razor blade or utility knife
- Wire stripper with cutting blade
- Needle nose pliers
Warning: Even if there is no voltage present at the plug end of the receptacle, it may be present inside the electrical box. You must not remove a receptacle with any chance of live voltage being present. If you cannot tell with certainty which circuit breaker delivers the voltage to the receptacle, don’t proceed until all the circuit breakers are turned off.
Steps to Replacing Receptacle
- Turn off power for the circuit your receptacle is on, at the breaker box, before beginning any work. Use a receptacle tester to make certain that there is no voltage present. But remember, since it is difficult to tell which circuit an outlet is on if there is no power at the plug end, you really need to shut all the breakers off.
- Remove the center screw to take off the cover plate. It may stick from the paint around it, so just carefully cut the paint away with your razor blade or utility knife.
- The receptacle is held into the electrical box by two mounting screws. Remove those. Pull the receptacle out carefully to reveal the wires.
- Next, you need to look at the configuration of the wires. Usually, there will be wires of three different colors attached to the receptacle. The black wire is the “hot” or “live” wire that supplies the voltage and is typically attached to the brass-colored screw terminal. The white wire is the neutral wire that typically attaches to the silver-colored screw terminal. A bare copper wire or a green insulated wire is the ground wire. One of them should attach to the green grounding screw on the receptacle, while another may connect to the electrical box – if it is metal, not plastic. (Some wires will have different configurations, like one hot and one neutral or two hot and two neutral wires. You need to recreate the exact configuration in the new receptacle.)
- You will now need to confirm the amperage for your new receptacle as explained above. If you find a contradiction in the wiring, such as a 14-gauge wire being fed from a 20-amp circuit breaker, it’s time to call in a professional as this is a potentially very dangerous situation. However, if everything is configured correctly, continue.
- Remove the wires from the receptacle by loosening the terminal screws. Caution: If you discover that either the wires or the insulation has become brittle or frayed, a professional electrician should rewire that part of the circuit for you.
- If necessary, strip about three fourths of an inch of insulation from the end of the wires.
- Connect the wires to the new receptacle in the same configuration as they were connected to the old receptacle. Be sure you create a “C” shaped loop at the end of the wire and loop it in a clockwise direction under the terminal screw heads so these will pull wire loops tighter. Make sure all stripped wire is safely secured under the screw heads and clip off any excess wire without insulation. Never connect more than one wire to a single terminal.
- Now carefully replace the wires in the electrical box and push it back in. Replace the mounting screws and put the cover plate back on. Make sure you have installed the receptacle correctly for the type of cord it will take, a two-prong or three-prong grounding cord. Take note, the slots in some receptacles are not alike, as one is wider than the other one. The wider one contacts the neutral wire and the narrower one contacts the hot wire. The difference in size means the plug will only fit in one way, so you want to install the receptacle accordingly. The reasoning behind the “polarized” plug is that it continues the neutral and hot wire configuration from the circuit to the appliance.
- Restore power to the circuit. Use your receptacle tester to make sure you have wired the receptacle properly.
There are many things you can do to help keep your home and family safe from electrical problems. Regularly inspecting your appliances, breaker box, cords and wires is a great way to start. You can also do routine, simple electrical maintenance around the house, like replacing worn out appliances, wires and cords. Following the safety rules outlined above will help to prevent electrical fires as well. However, when it comes to larger electrical maintenance issues, it may be best to let a professional electrician do the work for you.
*Performing electrical maintenance can be dangerous. A licensed electrician should handle most electrical maintenance jobs in your home to ensure your safety. The preceding is for information purposes only.